Powered by Blogger.

August 20, 2011

CREME' CARAMEL/CARAMEL CUSTARD...a fab party dessert!

A really easy fool proof recipe of this perfect dessert!...the secret here is to use full cream Milk of the best quality you can find, I have perfected this recipe over a period of several years, since it is difficult to achieve that perfect melt-in-the-mouth creamy gorgeousness the Creme' Caramel deserves!!!
Ingredients-
for the caramel
  • Sugar-6 tbsp
  • Water-2 tbsp
For the Custard
  • Whole/Full cream Milk-1 and 1/2 cups
  • Skim Milk Powder- 100 gms
  • Eggs-4
  • Pure Vanilla extract- 2 tsp
  • Condensed Milk- 5 tbsp
Method-
  • Combine the sugar and water for the caramel and set on heat, let the sugar  melt and bubble away, keep stirring all the time, till it achieves a deep brown/golden colour.
  • Take a metallic mould, one which can be put in the pressure cooker for steaming later.
  • Pour hot caramel and swirl all around quickly before it hardens, no need to grease, set aside.
  • Combine all the ingredients for the custard in a large bowl and beat well.
  • Pour into prepared tin, and cover with a piece of foil.
  • Steam in pressure cooker without whistle for 20 minutes,switch off flame and let cool
Invert onto serving plate and serve warm or chilled along with Fruits/Vanilla Ice cream/whipped cream.

Print Friendly and PDF Read more...

August 15, 2011

CHEESE AND ONION QUICHE


What is a Quiche??...an open pastry case, filled with a mixture of eggs, cream and other savoury (= not sweet) foods, which is baked and eaten hot or cold
pronounced as -/kÄ“SH/
This delicious flaky pastry shell filled creamy savoury treat is a perfect accompaniment to your evening Tea or Coffee.
Ingredients-
for the pastry  shell-
  •  Plain flour-175 gms
  • Salted butter-80 g
  • Chilled water- a couple of tbsp.
For the filling-
  • Milk-200 ml
  • Butter-1 tbsp
  • Onion-1 medium chopped
  • Heavy Cream-2 tbsp
  • Eggs-2
  • Cheese-1/2 cup grated
  • English mustard-1/2 tsp
  • Salt and black pepper to taste
For the pastry shell-
  • Sieve flour in a large bowl.
  • Rub in the butter till the mixture resembles fine breadcrumbs.
  • Add chilled water, a tbsp at a time till the whole thing comes together as a stiff dough.
  • Wrap in cling film and chill for 15 minutes.
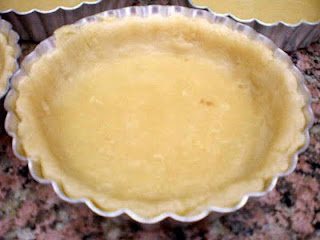
  • Gently unwrap and roll out pastry, grease and flour one large tart pan or 4 individual pans.
  • Fit out the pastry and trim edges, return to chill for another 15 minutes.
  • In the meantime preheat oven at 200 C, bake  the cases for 15 minutes and take out.
For the filling-
  • Heat butter gently, and  add onions, let sweat.Turn off heat when pink.
  • Add the rest of the ingredients to the cooled onions, reserving only a little egg white.
  • Brush pastry cases with the reserved egg white to seal in and prevent pastry from turning soggy.
  • Gently spoon in the filling in to the shells and bake for 20-30 minutes till filling is set.
  • Serve warm.

Print Friendly and PDF Read more...
August 1, 2011

CRUNCHY PEANUT BUTTER COOKIES- Easy Step-by-step recipe

These are the perfect accomapaniment to your cup of Coffee,... crispy, crunchy, melt-in-the-mouth buttery goodness and so easy too! They are bound to become yours and your kids favourite too!! After all who can say no to protein packed cookies that are delicious and easy to boot!!
Here's the recipe-
Ingredients-
(makes 24)
  • Plain flour-140 gms
  • Soda-bi-carb- 1/2 tsp
  • Salt-1/2 tsp
  • Butter-115 gms (at room temp.)
  • Egg-1
  • Vanilla essence-1 tsp
  • Crunchy peanut butter- 250 gms
  • Sugar-165 gms
Method-
  1. Sift together the flour, soda and salt and keep aside.
  2. Cream the butter and sugar together until light and fluffy.
  3. Stir in the Peanut butter and blend well, stir in the dry ingredients.
  4. Chill till firm.
  5. Preheat oven to 180 C, Grease 2 baking sheets.
  6. Roll out teaspoons of dough into balls.
  7. Place on prepared sheets and with a fork, make a criss cross pattern as shown in pic.
  8. Bake till lightly coloured, 12-15 minutes.
  9. Cool on a wire rack.

Print Friendly and PDF Read more...

June 16, 2011

THAI YELLOW CHICKEN CURRY- Easy step by step recipe

It is after a long hiatus that I am writing this post, but I do promise to be regular from now on, I would also like to thank each one of my readers who have been regularly writing in to me for their queries or suggestions.Please do keep writing in at bindiyasingh7@gmail.com.
Today I made this warm, milky, flavorful Thai curry which is very comforting eaten with freshly boiled basmati or jasmine rice, it scores high on the nutrition scale too and is tasty to boot, so lets get cooking!
Thai yellow curry paste is easily available at all supermarkets and is easily distinguishable from its Red and Green counterparts, using Coconut milk from a tetrapack is so easy and I definitely prefer it over the elbow grease of extracting milk from fresh coconuts.

Ingredients-
  • Boneless Chicken- 500gms
  • Coconut Milk- 200 ml (freshly squeezed from 2 coconuts or packaged)
  • Thai yellow curry paste-50 gms
  • Refined oil-2 tbsp
  • French beans- a handful, top and tail
  • Brinjals(long variety)- 2-3 sliced lengthwise
  • Cauliflower(separate into florets) 1/2 cup
  • Carrots-1/2 cup diced, if desired
  • Cilantro/ Coriander- for garnish
  • Salt and black pepper to season
Method-
  1. Heat oil in a heavy bottom pan and empty the contents of Yellow Curry paste(easily available at all supermarkets).Fry for a minute.
  2. Add the washed Chicken pieces and continue frying on low heat for another 5-8 minutes.
  3. Next tip in the coconut milk and stir well, add salt.
  4. Add the veggies and cover, add 1/2 cup more water if required.
  5. Cook for another 15-20 minutes till the Chicken and veggies are both cooked through, taste and adjust seasoning.
  6. Garnish with cilantro and serve with freshly boiled rice.Enjoy!

Print Friendly and PDF Read more...

May 17, 2011

BE SMART...DIY LIKE HE DID IT!

My brother lives alone in the US alone and is constantly in a fix about everything,... specifically Cooking...and he is forever on the phone with me asking me what to do???what to cook???how to cook???what to eat??? and so on and so forth haha.
Recently he came across an even bigger problem, his stove was not working and trust me it is enough for him to throw a fit... and call me up...of course lol, after hearing him out patiently, I suggested that he get either a repairman or as a last resort another stove top, now he being a student and on a tight budget at that was so completely devastated...then suddenly it stuck me...I had come across this cool website Partselect.com.
Both of us logged onto the site together and heyy check this out...there it was, everything you ever needed and on top of that- same day shipping, 30 day returns, 2 million parts, as we checked out the brand he owns there was even listings by colour, material and what not!
He quickly checked out what he needed, and there are even videos of how to replace that part, how helpful is that.I then pointed out to another good feature a Virtual repairman!, you just put in the model number and he will diagnose the problem for u!!
All in all so very helpful and my brother happily reported he got the stove fixed at a fraction of the cost, so I decided to post about it so that it helps my readers in a fix just liked it helped my bro!

Print Friendly and PDF Read more...

March 7, 2011

GOOEY CHOCOLATE CAKE FOR MY BIRTHDAY (eggless and healthy too!)

This is the cake I chose to bake on my birthday today, since a lot of my family and friends don't eat eggs.The cake is deliciously moist and tender due to the addition of yogurt, and intense chocolaty too due to the generous amounts of cocoa powder, a keeper all the way for sure, this is my go to recipe for an eggless cake!
The recipe is from the very talented Deeba's kitty and can be found here, I however played around with outstanding results, omitting eggs altogether whilst increasing the amount of yogurt.
 
Ingredients:
Flour – 1 1/2 cups
Wholewheat flour -1/2 cup
Cocoa – 2/3 cup
Instant Coffee – 2 tbsp
Baking Soda – 1 tsp
Baking powder – 1 tsp
Salted Butter – 1/2 cup; at room temperature
Sugar (powdered/caster) – 1 cup
Thick and fresh Yogurt/curd – 2 cups
Vanilla Extract – 1 tsp
Coffee Extract – 1 tsp (optional)
for filling-
Unsalted butter-50 gms
Chocolate-75gms
Icing Sugar 2 tbsp
for the frosting-
Full cream milk-2 cup
Cocoa powder-2 tbsp
Sugar (icing)-2 tbsp
knob of butter(1 tsp)
Method:
  • Grease well & flour pan you would be using approx 9' one, & preheat the oven to 180C.
  • Sift both the flours + baking powder + baking soda + salt + cocoa. Keep aside.
  • Beat the butter & sugar. Add the coffee & vanilla extract & beat.
  • Now alternatively add the flour mix & yogurt till well incorporated. Don’t over mix. The batter will be quite thick, ie, not a flowing one.
  • Turn into loaf tins/round/bundt cake pan level out & bake for 45 mins to an hour/until done. Slide a sheet of foil over the top loosely if you see it browning too soon.
  • Once done, cool in pan for 5 minutes, turn out on rack. 
    For the filling-
    Microwave chocolate and butter till beginning to soften, mix well icing sugar(sieved) and beat well ,slice cake in half and sandwich.
    for the frosting-
    Take a small saucepan and add ingredients for the frosting, boil rapidly for 20-25 minutes till thick,add butter, let cool.Drizzle on top of the cake and add silver balls, chocolate savings etc. as desired.

Print Friendly and PDF Read more...

February 26, 2011

NIGELLA'S CHOCOLATE FUDGE CAKE TOPPED WITH FRUIT

"This is the sort of cake you'd want to eat the whole of when you'd been chucked. But even the sight of it, proud and tall and thickly iced on its stand, comforts." what do you do when the cake is described as such?Bake it and frost it and eat it and go to heaven :-)
Well worth all the rave reviews on the net..this one is a keeper!The cake itself is pretty easy to pull together and has a fine, tender crumb but the buttercream frosting is a bit over the top, it calls for 250gms of butter which is a bit too much by any standards, I made it anyways but used it just to sandwich the cake and chucked the rest!, instead I opted for a lighter Chocolate frosting from one of my previous posts and also topped the cake with some fresh fruit, basically black grapes and kiwis, the end result...absolutely delicious!!.
Here's the recipe from Nigella's own website-

Ingredients

FOR THE CAKE:
  • 400g plain flour
  • 250g golden caster sugar
  • 100g light brown sugar
  • 50g best quality cocoa powder
  • 2 teaspoons baking powder
  • 1 teaspoon bicarbonate of soda
  • 1/2 teaspoon salt
  • 3 eggs
  • 142ml/small tub sour cream(I used yogurt with 1/2 teaspoon of lemon juice)
  • 1 tablespoon vanilla extract
  • 175g unsalted butter, melted and cooled
  • 125ml corn oil
  • 300ml chilled water
FOR THE FUDGE ICING:
  • 175g dark chocolate, minimum 70% cocoa solids
  • 250g unsalted butter, softened
  • 275g icing sugar, sifted
  • 1 tablespoon vanilla extract

Method

  1. Preheat the oven to 180°C.
  2. Butter and line the bottom of two 20cm sandwich tins.
  3. In a large bowl, mix together the flour, sugars, cocoa, baking powder, bicarb and salt. In another bowl whisk together the eggs, sour cream/yogurt and vanilla until blended. Using an electric mixer, beat together the melted butter and corn oil until just blended, then beat in the water, at this stage I was quite amused and excited to use chilled water, something I have never used before, it did cause the butter to harden up again but continue and things will be fine. Add the dry ingredients all at once and mix together on a slow speed. Add the egg mixture, and mix again until everything is blended and then pour into the prepared tins.
  4. Bake the cakes for 50-55 minutes, or until a cake-tester comes out clean. Cool the cakes in their tins on a wire rack for 15 minutes, and then turn the cakes out onto the rack to cool completely.
  5. To make the icing, melt the chocolate in the microwave - 2-3 minutes on medium should do it - or in a bowl sitting over a pan of simmering water, and let cool slightly.
  6. In another bowl beat the butter until it's soft and creamy and then add the sieved icing sugar and beat again until everything's light and fluffy.DO NOT SKIP THIS or the icing will be unsoothingly lumpy. Then gently add the vanilla and chocolate and mix together until everything is glossy and smooth.
  7. Sandwich the middle of the cake with about a quarter of the icing, and then ice the top and sides too, spreading and smoothing with a rubber spatula.
  8. I did use a quarter of the icing for sandwiching the cake but used a lighter, glossier frosting(recipe here) for the top.Top with fresh fruit.
Serves: 10. Or 1 with a broken heart!

Print Friendly and PDF Read more...

February 6, 2011

WINTER SPECIALS- CONDENSED MILK CARROT/GAJAR KA HALWA

The craving for dessert intensifies during Winter months, and I find myself hunting for a bite of something sweet especially after meals, gajar ka halwa/meetha is one such dessert without which Winter months seem incomplete, it is an absolute must-have!, mostly cooked in large quantities and stored in the fridge, small quantities are then taken out over time and heated till piping hot before consumption.Here's how to make this delicious dessert-
Ingredients-
  • Carrots- 3/4 kg
  • Condensed Milk-1 can
  • Milk- 1 liter full fat
  • Cardamom (green)-2-3 crushed
  • Mixed dry fruits-1/2 cup
  • Clarified butter(desi ghee)-1/2 cup+1 tbsp for frying the dry fruit
Method-
  1. Wash, peel and grate the carrots.
  2. Heat ghee in a heavy bottom pan and fry grated carrots till fragrant, about 15 minutes,this is very important to impart a good flavour to the halwa
  3. Add the Milk, condensed milk and cardamoms and cook on a slow flame, stirring carefully till Milk is absorbed, this will take about half an hour, do not stir too much or you will end up with a mush, but be careful not to burn it also.
  4. Adjust sugar, fry the dry fruits and garnish the halwa with them, you can also add some khoya/mawa to the halwa at this stage.
  5. Enjoy the halwa hot :-)

Print Friendly and PDF Read more...

January 22, 2011

Bakeware set shopping at CSN stores

First of all wishing my lovely readers a very Happy New Year! Hope you guys partied hard, coz I certainly did :-)...secondly I am soooo excited...finally I would be getting my first Springform pan, have been eying one for a really long time..., cheesecakes here I come!I think the benefits of such a pan are many, for sponge cakes, cheesecakes and angel cakes, they are so convenient, will be getting one from CSN stores, they have a great collection esp. their cute little tart and quiche pans.
And they also have a terrific range of Modern office furniture, which would be just lovely in my New office..so I am all set for some serious 2011 shopping!!
Till then take care

Print Friendly and PDF Read more...
Related Posts with Thumbnails

Back to TOP   

} catch(err) {}